- my porsche0select your porscheYear
- All
- 2026
- 2025
- 2024
- 2023
- 2022
- 2021
- 2020
- 2019
- 2018
- 2017
- 2016
- 2015
- 2014
- 2013
- 2012
- 2011
- 2010
- 2009
- 2008
- 2007
- 2006
- 2005
- 2004
- 2003
- 2002
- 2001
- 2000
- 1993
- 1992
- 1991
- 1990
- 1989
Model- 911 R - 991
- 911 GT3 RS 4.0 - 997.2
- 911 GT3 RS - 991
- 911 GT3 RS - 997.2
- 911 GT3 RS - 997
- 911 GT3 - 991.2
- 911 GT3 - 991
- 911 GT3 - 997.2
- 911 GT3 - 997
- 911 GT3 - 996
- 911 GT3 RS - 991.2
- 911 GT3 - 992
- 911 GT3 - 992.2
- 911 GT3 RS - 992
- 911 GT2 RS - 997.2
- 911 GT2 - 997
- 911 GT2 - 996
- 911 Turbo / S - 991.2
- 911 Turbo / S - 991
- 911 Turbo / S - 997.2
- 911 Turbo - 997
- 911 Turbo - 996
- 911 GT2 RS - 991.2
- 911 Turbo / S - 992
- 911 Carrera GTS - 991.2
- 911 Carrera S - 991.2
- 911 Carrera - 991.2
- 911 Carrera GTS - 991
- 911 Carrera S - 991
- 911 Carrera - 991
- 911 Carrera GTS - 997.2
- 911 Carrera - 997.2
- 911 Carrera - 997
- 911 Carrera GTS - 992
- 911 Carrera - 996
- 911 Carrera / S / 4S - 997.2
- 911 Carrera / S - 992
- 911 Carrera 4/4S - 992
- 911 Carrera / S / T - 992.2
- 911 Carrera 4/4S - 992.2
- 911 Carrera GTS Hybrid - 992.2
- Boxster - 986
- Cayman / Boxster - 718
- Cayman GT4 - 981
- Cayman / Boxster - 981
- Boxster Spyder - 981
- Cayman / Boxster - 987.2
- Cayman / Boxster - 987
- Boxster - 987
- Cayman GT4 / Boxster Spyder / GT4RS - 718
- Cayenne - 958
- Cayenne - 957
- Cayenne - 955
- Panamera - 970
- Panamera - 971
- Macan - 95B
- Macan - 95B.2
- Macan - 95B.3
- Cayenne - 9Y0E3
- 911 (964) - 964
- Car Not Listed?
Gomy porsche0Save my car - ProductsOpen
- ProjectsOpen
- ResourcesOpen
- MediaOpen
- InfoOpen
Your Cart
Your cart is empty
X
Shark Werks Coolant Pipe Fix for Porsche 996 / 997 / Turbo / GT3 / GT3RS / GT2RS
instructions FOR models:
- 911 GT3 RS 4.0 - 997.2
- 911 GT3 RS - 997.2
- 911 GT3 RS - 997
- More
- 911 GT3 - 997.2
- 911 GT3 - 997
- 911 GT3 - 996
- 911 GT2 RS - 997.2
- 911 GT2 - 997
- 911 GT2 - 996
- 911 Turbo - 997
- 911 Turbo - 996
Parts required:
- bolt size: M4 x 10mm length
- quantity: 6-8 depending on model
- tap size: M4x0.7 pitch
- sealant: Loctite 263 (p/n 1330585) or Loctite 271 -- 50ml is much more than than enough; very little is required.
NOTE - If you need to re-glue any fittings that were ejected from the engine you will also need:
- Loctite 620 (Green)
- Loctite SF7649 Primer" or "Klean 'N Prime Loctite Activator" (Item #37509)
- Paint Stripper or Gasket Remover
Also recommended:
- When servicing the coolant system, we recommend replacing all rubber hoses on vehicles 10+ years old to ensure there are no leaks later. We offer these sets for the 997 Turbo (Manual here / Tiptronic here), 996 GT3, 997 GT3 & RS, 997.2 GT3 & RS & 996 TT / GT2.
- On 997 Turbo / GT2 and 997/997.2 GT3 & RS models, we also reocommend replacing the plastic oil cooler tubes with our stainless steel pipes (Turbo version link, GT3 version link) to ensure there are no failures later due to the weak construction of this original part.
- We also recommend inspecting and possibly replacing the Thermostat, Coolant Expansion Tank, Water Pump, Camshaft Position Sensors, and Spark Plugs while working on the coolant system.
- Check the condition of your engine mounts (we often replace worn ones with semi-solid RSS upgraded ones)
- Replace the worn-out/cracked Auxiliary Recirculation Turbo Pump
- If your Turbo has the P0021 code and Camshaft issue you can perform this fix at the same time
Please read: Unfortunately we do not have the time to support and advise on this repair via telephone and email; we cannot offer further instruction or support than what is supplied here, and recommend you consult the numerous great Porsche forums (such as Rennlist and 6 Speed Online) for further instructions.
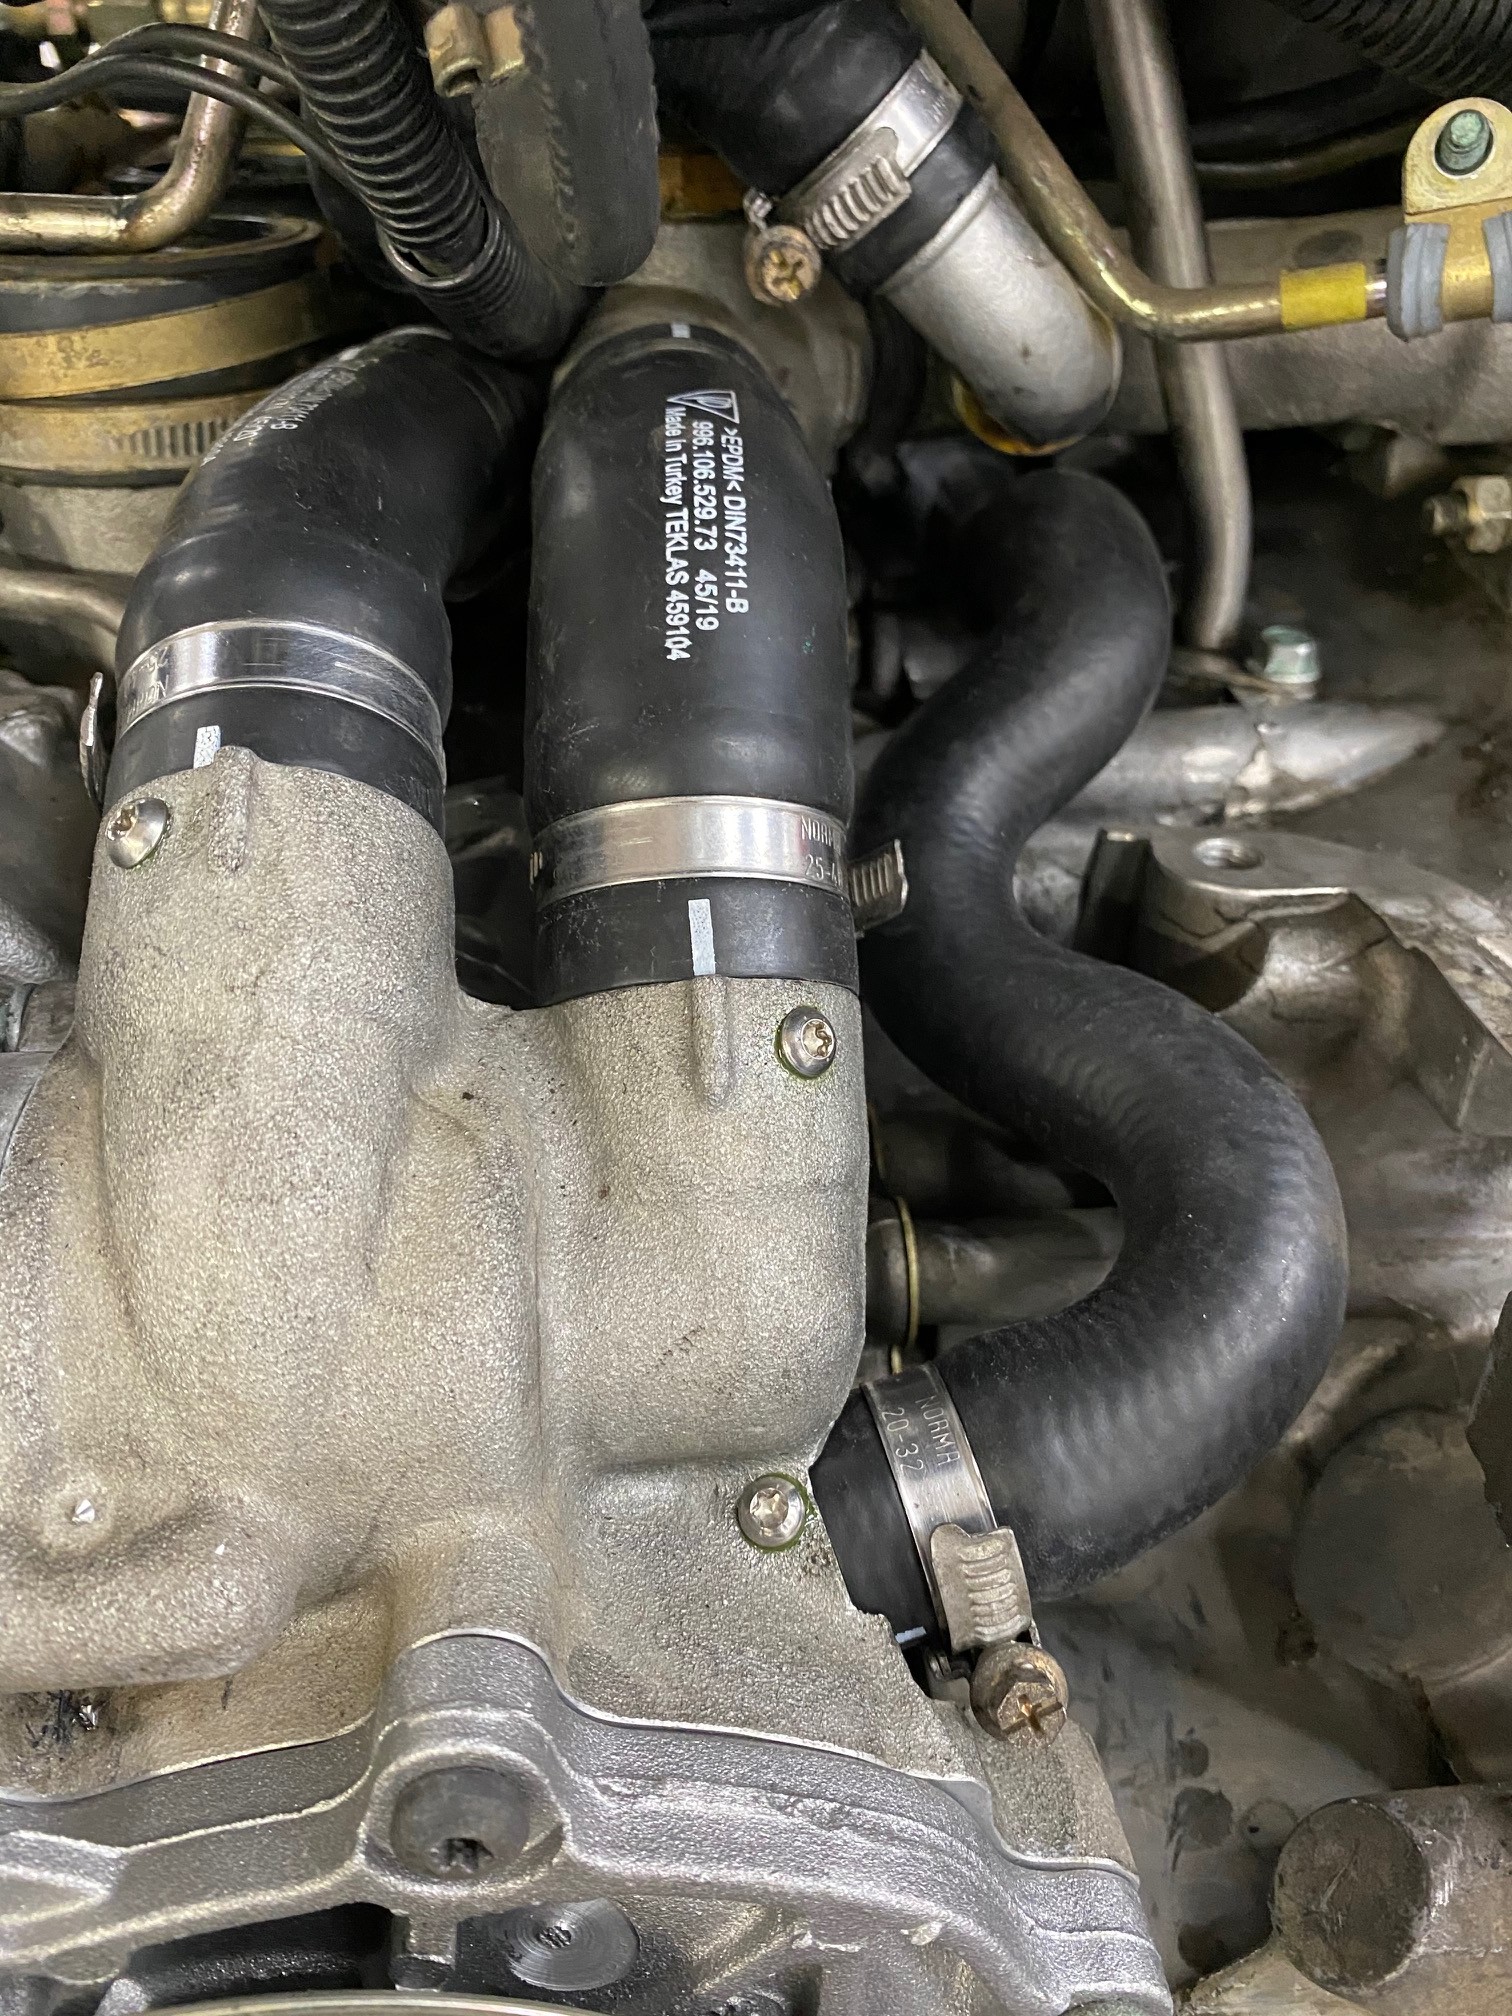
You may be aware of coolant pipe issues on GT1-block equipped models (GT3, GT2, Turbo), where coolant pipes come apart while driving and the rapid loss of engine coolant can cause spins/crashes at race tracks when slippery coolant sprays all over the rear tires.
The problem exists on the GT1 motor because there are a couple coolant pipes in these motors that are not a single cast piece: the larger cast pieces have extruded inlet/outlet tubes that are connected using an adhesive. There is no metal-to-metal friction or press-fit to keep these tubes in place, so after enough heat cycles the adhesive will soften/loosen up and the tube will come out of the cast block (with the hose still attached), resulting in a rapid loss of engine coolant.
Regardless of how the vehicle is driven, it seems this problem may eventually effect all 996/997 Turbo, GT2 and GT3 models including the 2010+ GT3 and GT3RS, 4.0 and GT2RS.
We have heard of many cases of this, and in fact the last time we were at Infineon Raceway, Alex and I were talking to someone about it when the exact problem happened to a 997 GT3 right in front of us -- a large steam cloud evacuated the rear of the GT3 and it spun on the hairpin! Luckily he missed the other cars and the barriers.
Here's a video showing how the tube comes apart:
Here's a diagram showing where the problem happens on 997 GT3 models: 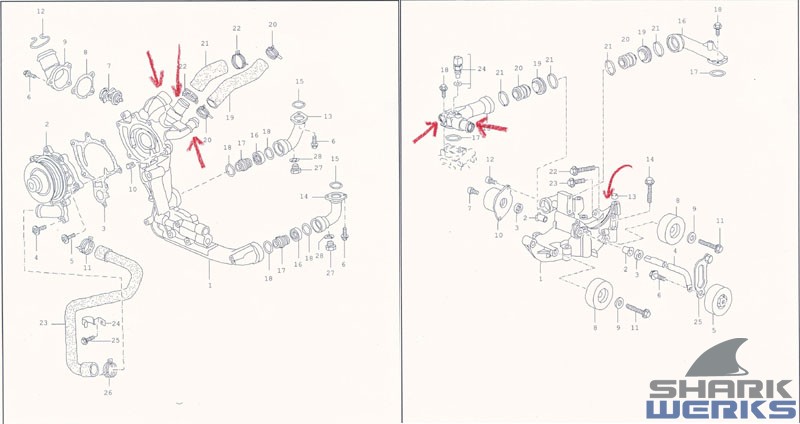
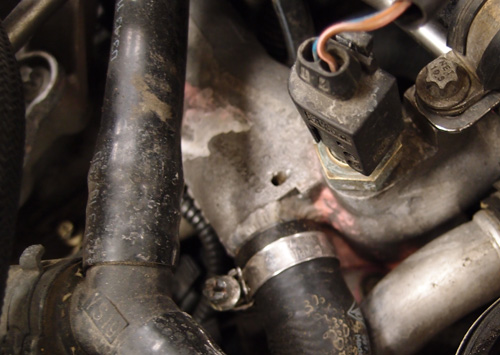
Here's a picture from a 996 Turbo's coolant pipe. Both of these tubes you see are slip-fit into the cast piece and fixed in place using an adhesive: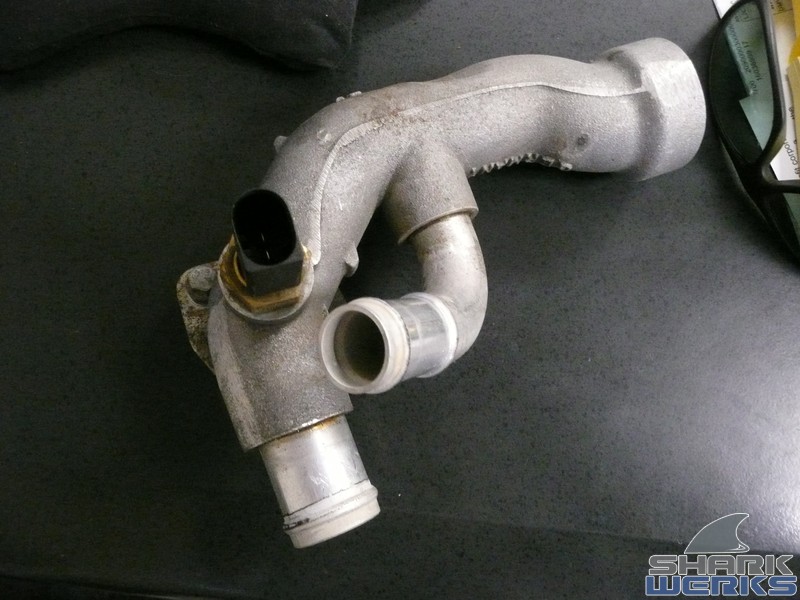
We first saw this in 2006 when we started building 996 Turbo engines. In fact, our 996 GT3 suffered from this exact problem earlier in its life.
James has a technique for fixing this, something we do for all Sharkwerks 3.9L or Sharkwerks 4.1 motor builds and any time a GT1 motor is removed from the car.
This week we had a 2011 GT3RS (project that was documented earlier) whose lucky owner will have plenty of track time with her. He decided that rather than wait until it might happen, he would rather be on the safe side and fix the problem now, preventing a scenario where the coolant might cause a high speed crash at a local track.
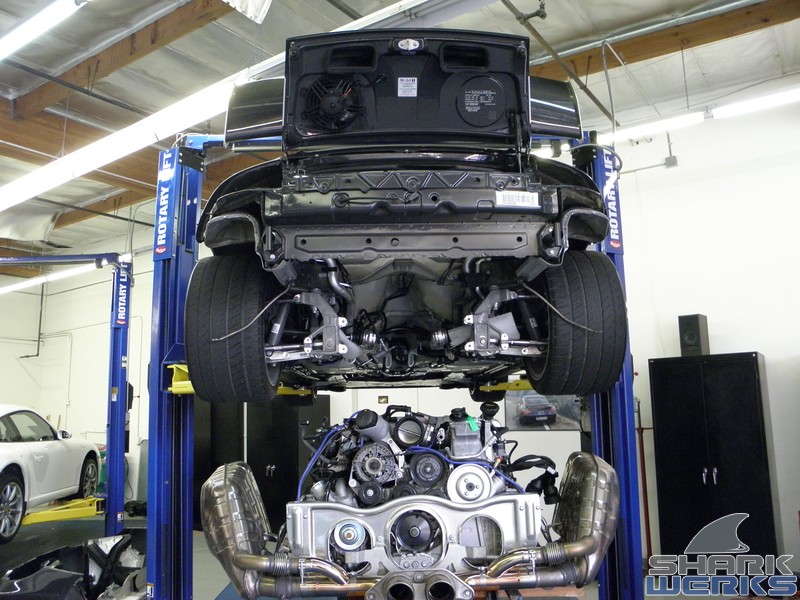
The bumper is removed exposing the Shark Werks GT3 Bypass Exhaust: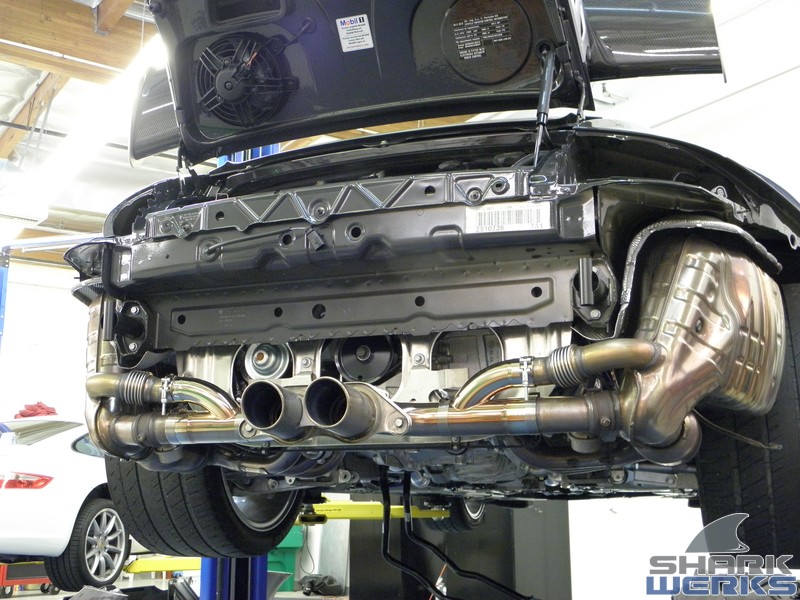
And despite the car's super low mileage, its factory fresh and perfectly running motor is removed from the car: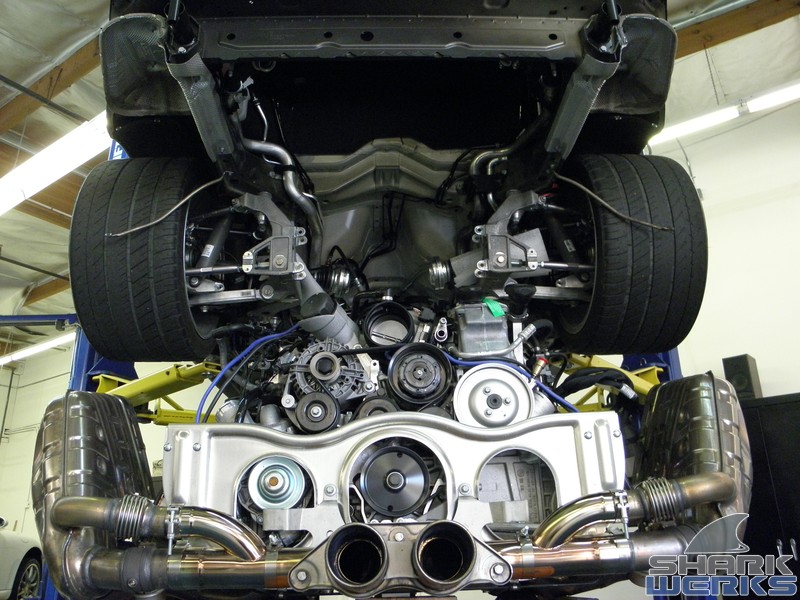
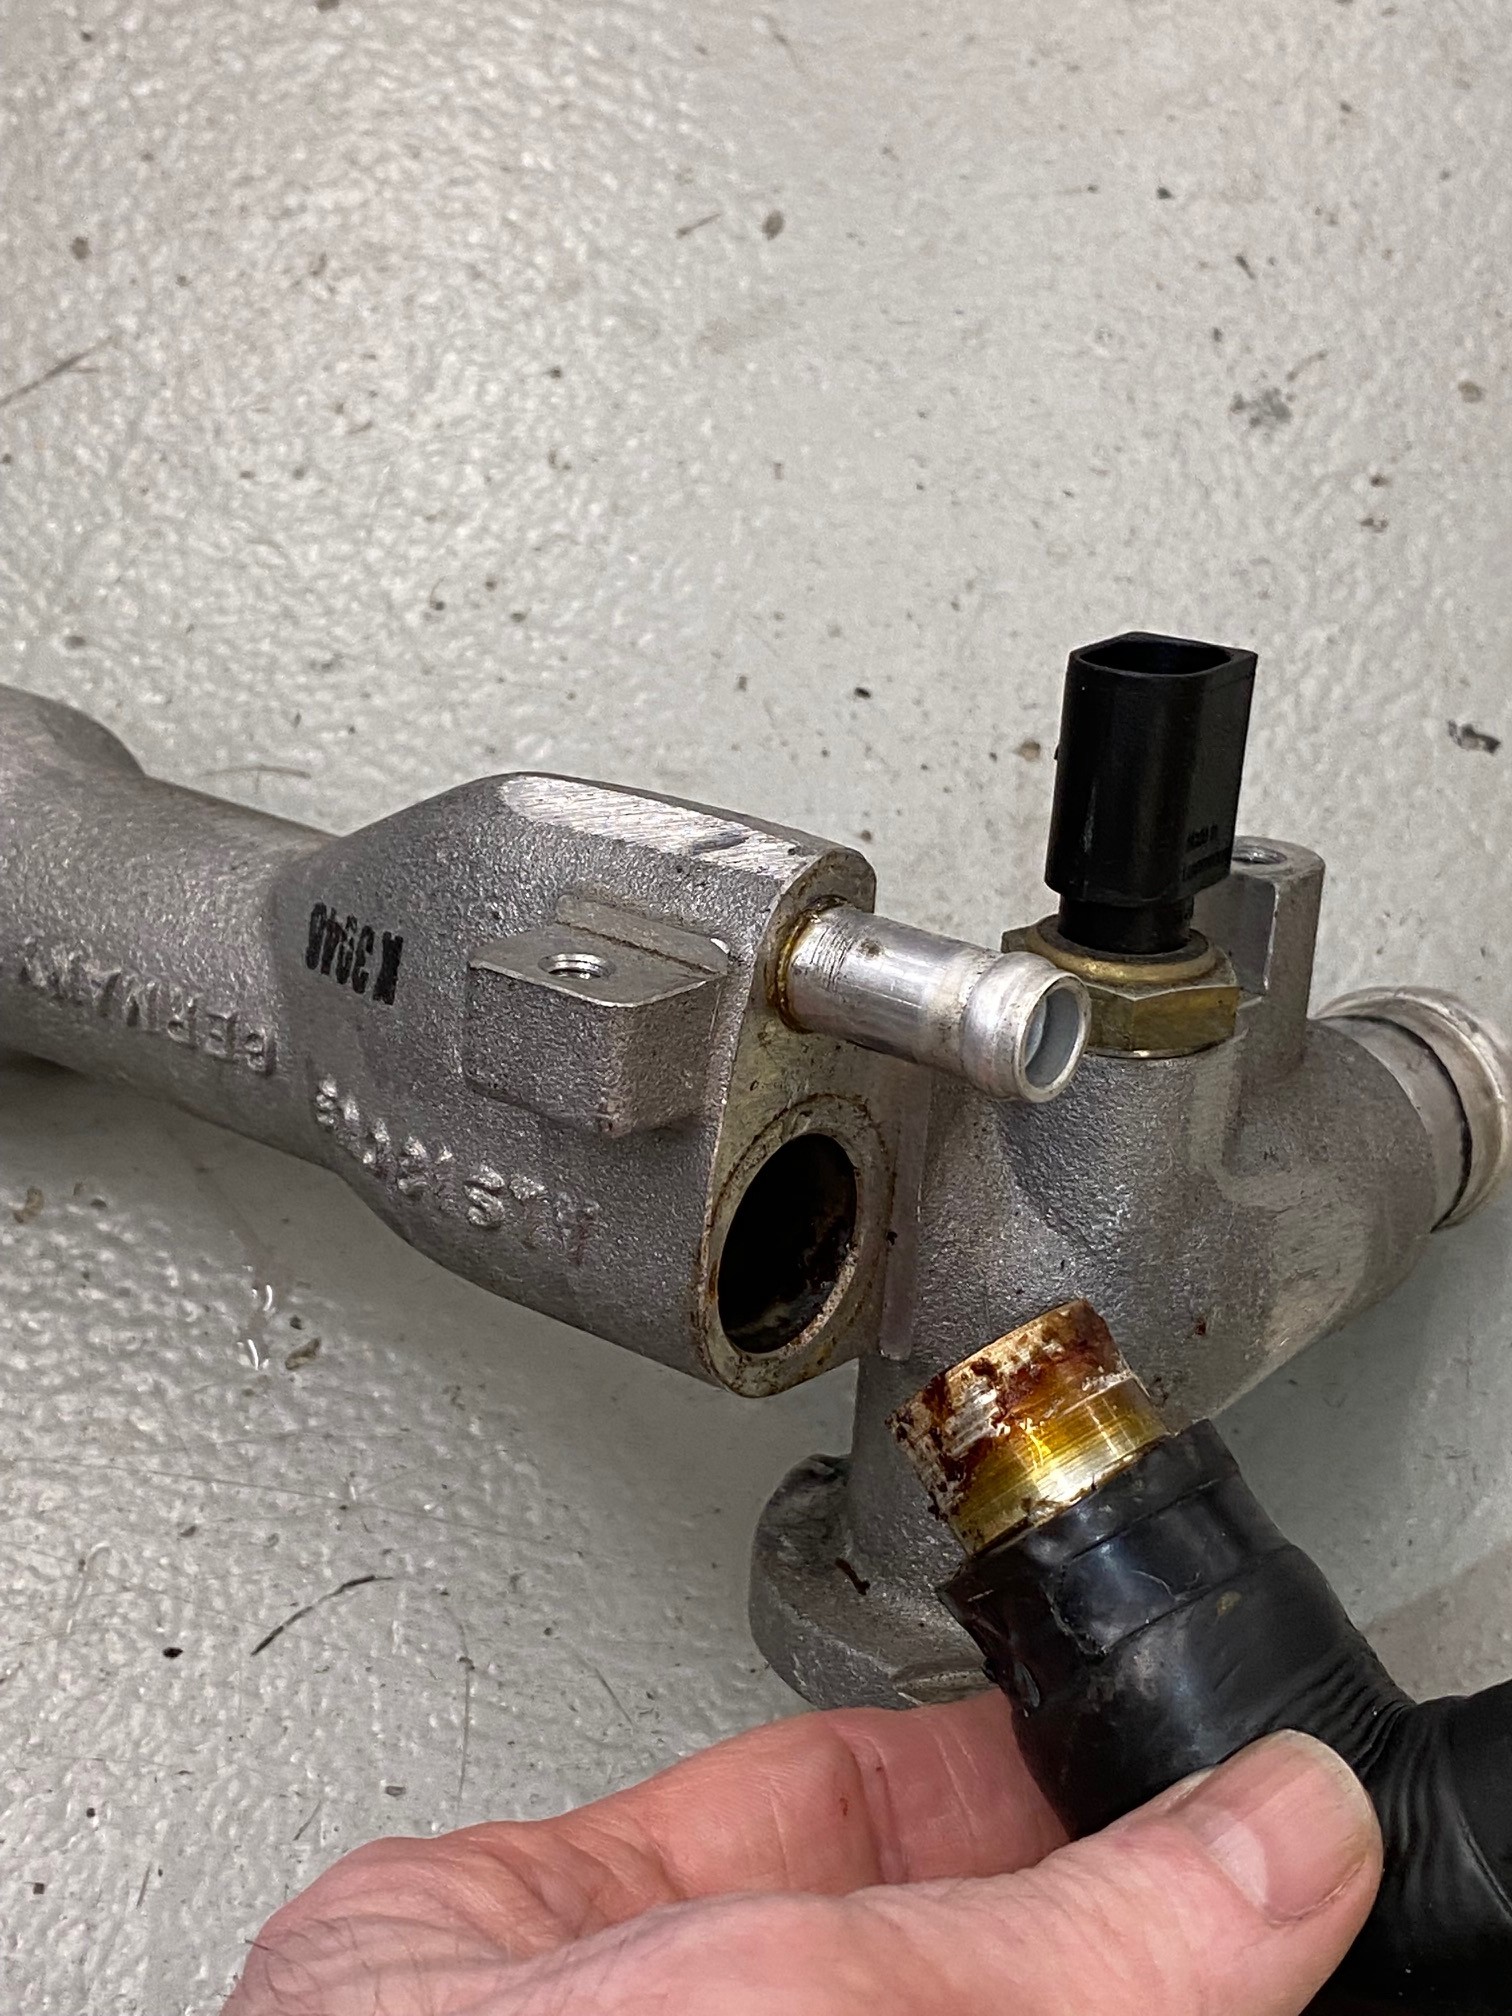
With the motor removed from the car, James locates each of the potential problem areas and drills a small hole through the cast piece and into the tube (that normally would come flying out at some point in the future). Then he threads a bolt through both pieces and using loctite secures the bolt in place. This locks the tube together, preventing it from coming apart regardless of heat cycles.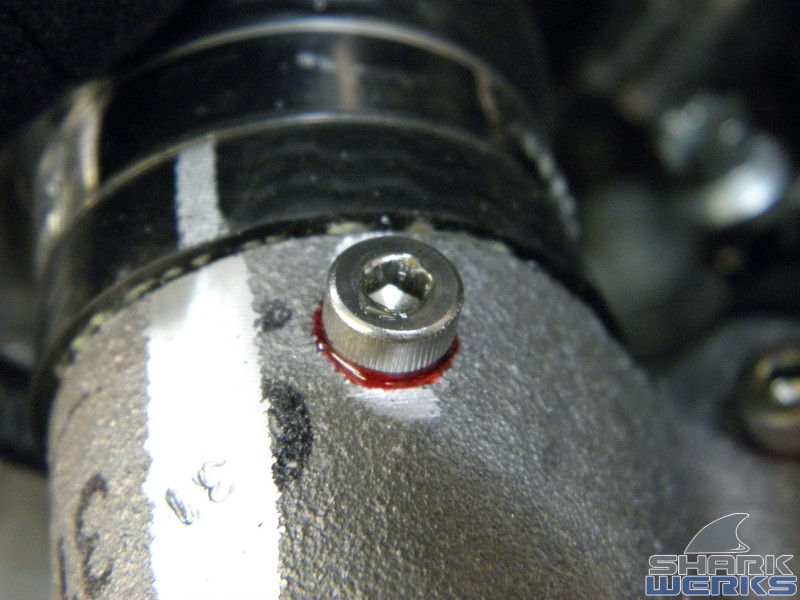

The coolant pipes will now act as a single piece.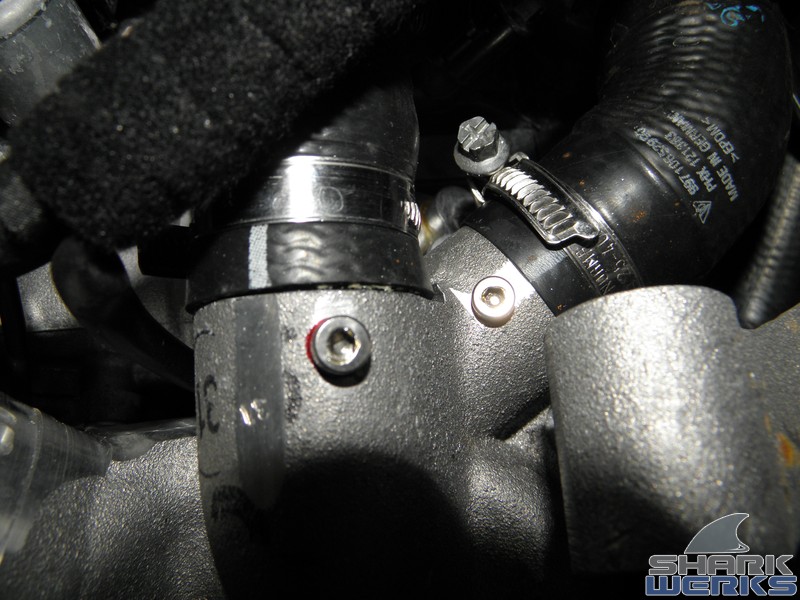
All the tubes are buttoned up...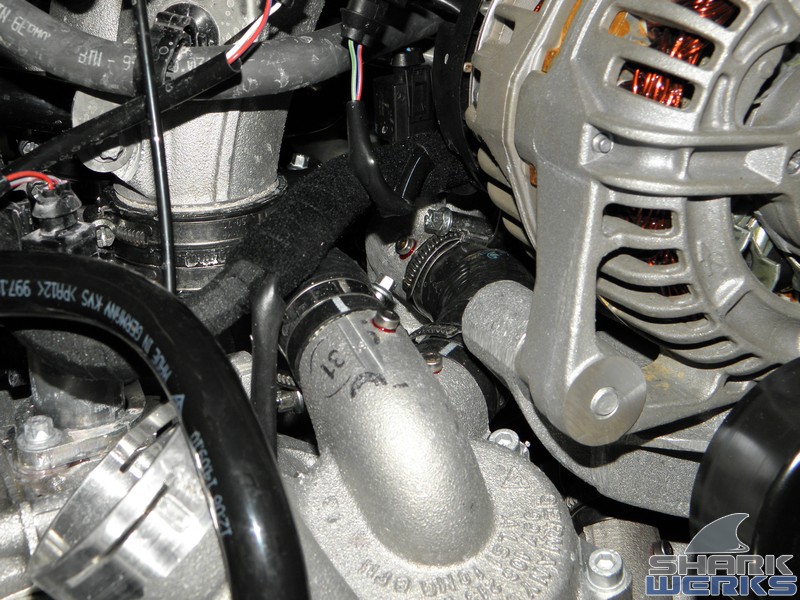
You can manage this repair without introducing any significant metal into the cooling system by disassembling various parts of the cooling manifolds, stuffing with clean papertowels or rags, and using a shop-vac as you work.
Ideally there would be a threaded fitting for these tubes with a tapped female end to assemble it -- such as those found on the Cup cars. This would require some complexity. You would need to make custom hose fittings of several sizes, and you would need to set up a fixture to consistently tap the threads on all the removed housings.
Also, if a tube has been removed from the engine, is loose, or the original adhesive appears to be in bad shape or is inconsistent, you need to remove the fitting. We heat the tube to remove it, carefully clean all debris and old glue off both sides of the connection using paint stripper or gasket remover. Once the adhesive is removed you can use a fine sandpaper to clean it more.
We recommend using Loctite 620 (Green) on the removed tube. Then you must use an activator to have this set in any reasonable amount of time because there is only aluminum used in these fittings. We use "Loctite SF7649 Primer" or "Klean 'N Prime Loctite Activator" (Item #37509) to prep the other female side of the fitting. This new seal has over 10x the viscocity of Loctite Red, and will easily handle the pressure of the cooling system indefinitely.
Another, completely unrelated, and lesser known issue involves the plastic coolant elbow pipes that run to the oil cooler (aka heat exchanger). These pipes are molded plastic and have a very thin wall where the pipe connects to the engine with an O-ring seal. The problem is that over time and mileage, the thin plastic wall will break down at the o-ring slot (its weakest and thinnest point) causing a crack to appear. Eventually the whole engine will need to be removed in order to replace a cheap plastic tube. Both of these issues have been observed on the 997 Turbo models as well.Here's a razor blade showing where the stock piece fails. The car had approximately 40,000 miles of use in a mild climate: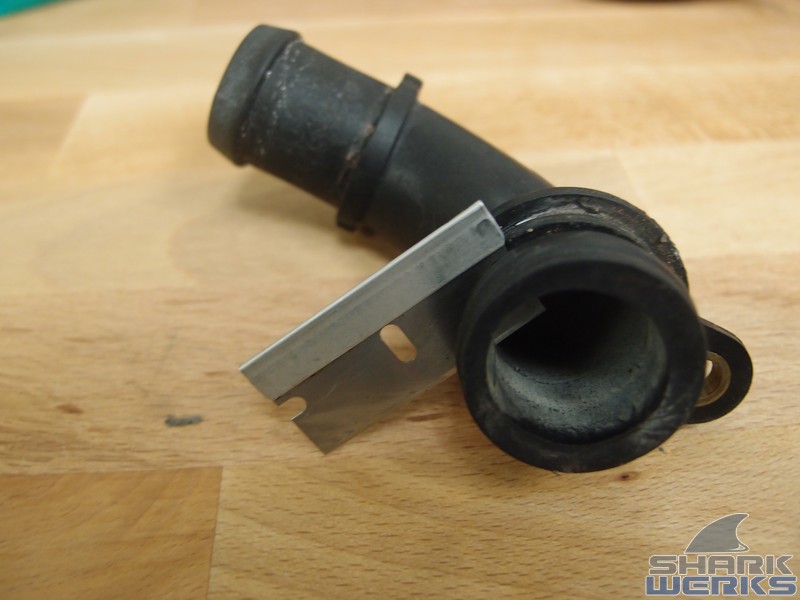
And the motor is lifted back into place, the remaining details addressed.
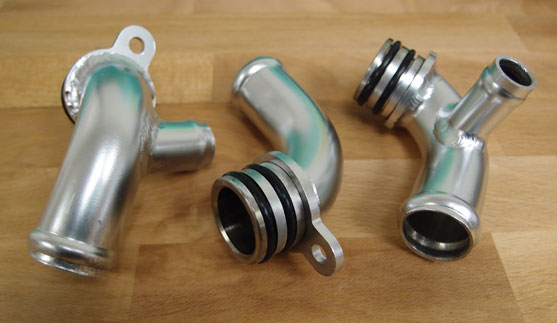
A pair of SharkWerks coolant pipes will do the trick for the GT3: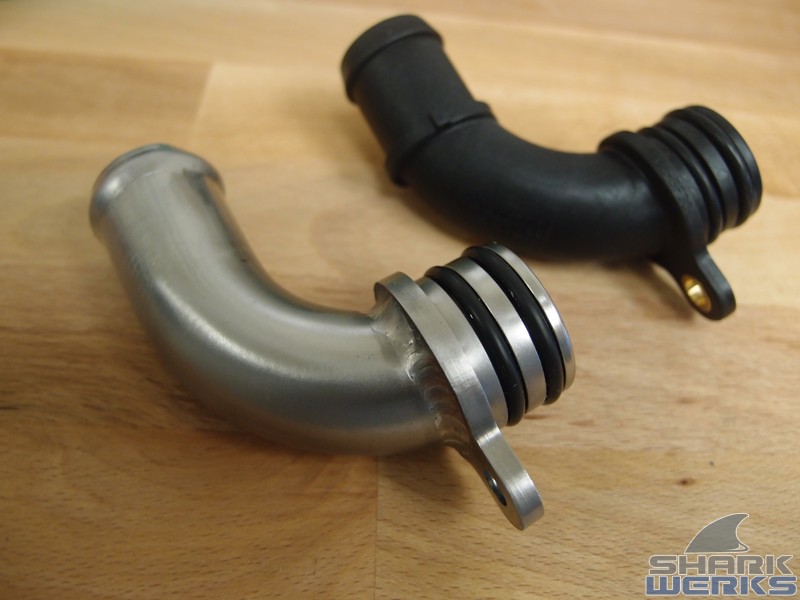
For the 997 Turbo and 997 GT2 / GT2RS models there's actually a different Shark Werks Three Piece coolant pipe kit
And here she is, now ready for an enjoyable weekend around the track at 8000 RPMs. :)

For more of this car, check out the whole project here.
Why We Don't Weld
We have heard the question 100s of times... why doesn't Shark Werks weld the coolant lines? Well, first off, either method works perfectly fine to accomplish the goal here of SECURING the coolant lines in place. The goal with pinning or welding is to prevent you from losing 5 gallons of coolant in a few seconds, especially at high speeds in a Porsche. The way we see it is, why weld and risk the problems and extra cost and complexity, when pinning accomplishes this with much less intrusion and destruction?
Isn't welding better?
No, not in this case! At least we do not believe so, and have consulted our many other independent expert metalworkers and welders over the years about our thoughts and they have all agreed with us: Pinning makes sense. If it didn't, we would be welding the coolant tubes. We would be happy to charge more money for a larger service, but we think it's unnecessary and even a bad idea. And after seeing several cracked coolant welds by "experts", our opinion was even stronger about this:
1) You would be welding a solid extruded aluminum tube to a porous, cast aluminum housing. That alone is less than ideal -- it's not the same as welding two tubes together.
2) The fittings and tubes are different alloys, as is the welding filler, and all with different rates of thermal expansion. Therefore, they will contract and expand at different rates. This is probably why Porsche glued them together.
3) This difference of thermal expansion is more likely to lead to a crack years later. Even if it can be pressure tested and show no cracks now, it may crack 10-years from now, requiring you to remove the engine, disassemble and re-weld, or patch it up the same as you would with a pinning had it not held.
4) Welding is attempting to fix the primary issue (Coolant Pipes Ejecting from the Engine) by welding a bead around the whole thing. If the problem is the tubes ejecting, not drizzling coolant from the seal, why not just tack weld it in place and call it a day?
All these concerns aside, a properly welded coolant line will never eject from the engine. It may have a pin hole leak, which seems to be the unfounded concern people have with pinning.
Welding Gone Bad:
This welded coolant line looked fine for a couple years, but a large hole developed later in the porous aluminum. A significant coolant leak was the result.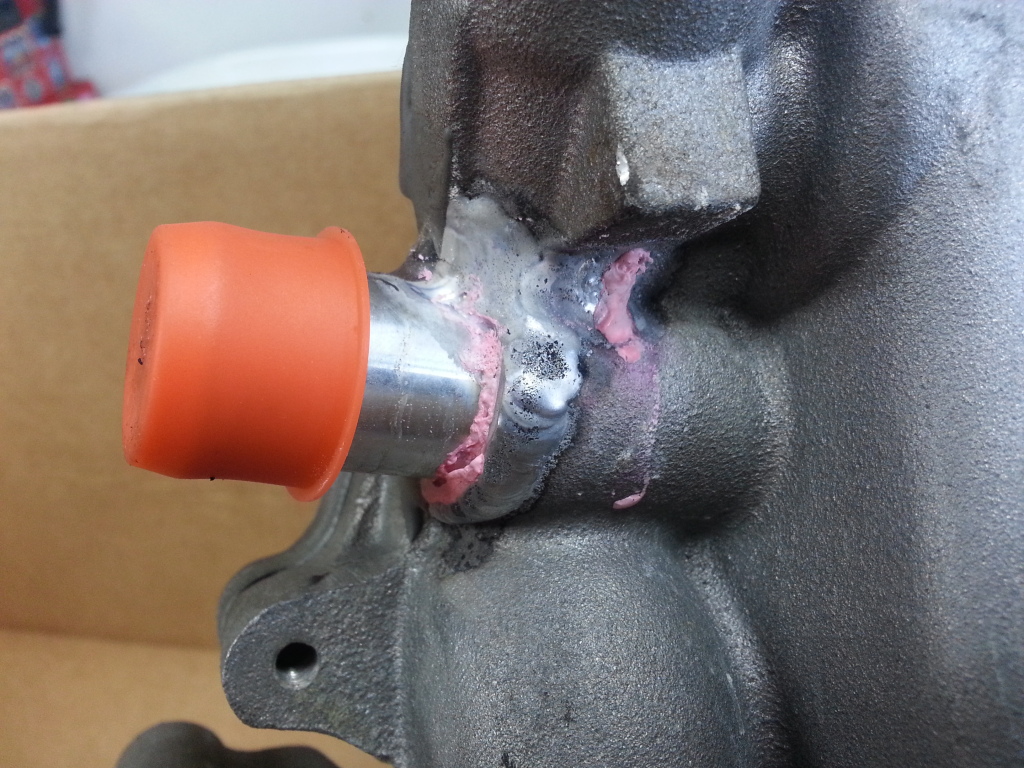
Another welded coolant line that started leaking, which was then covered in a glue to try and patch the issue. This car had the engine removed and the parts had to be replaced and fixed again later.
Won't the Coolant Still Leak from the Fitting if it's Pinned?
No, because the coolant does not leak through the original sealant. The fittings simply do not have enough adhesion to prevent them from ejecting. Pinning fixes this. Coolant won't flow through the original sealant. In our experience it has not leaked out and it won't disintegrate. We have seen plenty of coolant lines that were pinned nearly 100,000 miles ago, after years of track use, that were still not leaking.
But if this is a concern for you, there are additional steps you can take. If a line is loose fitting or the adhesive seems less consistent, we will heat and remove the tube, clean it with gasket remover / paint stripper, and reseal it with green loctite and activator. Then it's pinned in place. Some people even apply JB Weld over the outer connection (which seems unnecesary or overkill).
If a tiny leak ever does develop in the sealant in the future, you could drain the coolant, remove the pin, eject the line, and re-seal it. That would likely fix it for another 20 years. This is a non catastrophic failure and not much case for alarm.
Won't you add Metal to the Cooling System if you Drill and Tap the Fittings?
No, and this is rather easy to manage and very low risk even in the worst case. Some people do this repair with the engine still installed in the car, so we cannot comment on it in those cases (it should still be fine if you're careful), but using our method, we always remove it for better access to everything. Once removed, most of the fittings are loose and you can easily manage the shavings during drilling and tapping, long before you re-assemble and add coolant back to the system. You can fully remove all of these pieces when the engine is out leaving zero contamination of metal the the coolant lines being tapped and drilled.
Even if you're doing this with the engine IN the car (which we do not recommend), you're drilling from the outside-in, you can easily vacuum shavings as you drill. This means by far the majority of the shavings are never even introduced to the inner coolant line. Only the final shavings from the punch-through the tube are dropped in. However, you can easily stuff clean paper towels or rags inside those tubes, and vacuum from the outside, carefully remove those, then clean the interior with compressed air and vacuum before reassembly. Finally, even if you did introduce a few metal shavings into the cooling system, this is very unlikely to cause any problems. Your cooling system likely has much larger pieces of debris from various methods of contamination, and this is why from time to time a coolant flush is required. If you've ever had a water pump failure or other mechanical issue, you likely had magnitudes more debris in your cooling system, and it still would be unlikely to cause any engine damage just by the nature of the system having large openings and not being extremely sensitive to this type of problem (unlike the bearings in your crankcase, etc.).
With the age of these cars now being a concern, we recommend replacing all rubber hoses and upgrading the upper manifold tubes from plastic to our stainless steel parts. For the 997.2 GT3 / RS & 4.0 cars we also perform a camshaft actuator/adjuster upgrade to fix the failure points on those.
On most Mezger equipped cars, it does make the most sense to remove the engine to access all of these hoses and tubes.